
Inspect The Caulking In Your Bathrooms & Kitchens
So, the caulking around your kitchen and bathroom sinks, tubs, windows, and other fixtures are looking a little worse for wear. Maybe it’s stained, cracked, peeling, or moldy. Freshening the caulk in those areas is a relatively simple task . . . once you’ve survived the caulk aisle at your favorite hardware store.

So many brands. So many choices; sanded or unsanded; paintable or unpaintable; white, almond, black, bronze or clear; one-year, five-year, 10-year or 30-year guarantees; 79 cents a tube or $8.99 a tube. It’s enough to make you caulking crazy!
The best caulks for tubs, sinks, or shower stalls come in tubes labeled “Tub and Tile” or “Kitchen and Bath.” These will be acrylic latex or silicone that resist mildew and to stick to smooth, non-porous surfaces.
The kind of caulk you choose depends on the project.
Latex | For windows, doors, and baseboards. Seal minor cracks around tubs and showers, and fill cracks or nail holes in drywall. Latex can be used to fill around bathroom tiles as well. It’s the easiest of caulks to use because it’s water-based. You can actually trim or smooth it with your finger. It can be cleaned up with water (not paint thinner) but is also water-resistant when dry. It can then be sanded or painted.
TIP: Don’t use latex caulk to fill cracks in tiles or to fill in missing grout. This leads to a bigger problem down the road.
Silicone | Best for large cracks or joints around bathroom and kitchen fixtures. Silicone will keep its seal when the joint, crack or gap stretches or compresses. Silicone is more durable, long-lasting and holds up well in temperature extremes. Pure silicone caulk will stick to painted surfaces, though you can’t paint over it. However, there is a paintable silicone caulk if you need it. Again, a trip to that darned caulking aisle.
Let’s Get Started
What you will need:
- Caulking Gun
- Caulk
- Utility Knife or 5-in-1 Painters Tool and Razor Scraper
- DIY Mildew Cleaner (see below)
- Spray Bottle
- Liquid Chlorine Bleach
- Ammonia-Free Powdered Laundry Detergent
- Hair Dryer
- Painter’s Tape
- Nail & Masking Tape
- Buy a caulking gun and a tube of caulk. Most caulks are fairly inexpensive; roughly $2 for a tube of latex and $3 for silicone.
- Remove the old caulking for better application and appearance as well as to kill any mildew behind it.
- Using a 5-in-1 painter’s tool and a razor scraper, or a utility knife, slice away the old acrylic latex caulk with quick, sharp strokes. Be careful, metal blades can scratch plastic fixtures. Use a plastic razor blade instead. Caulk removers may harm plastic. Read the instructions if using a remover product. Wipe a damp cotton rag over the joint to remove the caulk dust.
- Clean the joint.
- Add 1 quart of liquid chlorine bleach to 3 quarts of warm water.
- Add 1/3 cup of powdered laundry detergent.
- Mix thoroughly and place in a spray bottle.
- Spray the mixture onto the mildewed area. Let it sit until the black mildew turns white. Rinse with fresh water.
- Remember to wear gloves and eye protection, ventilate the area and use ammonia-free detergent. Mixing bleach with a solution containing ammonia can release a dangerous gas that is harmful to your lungs.
- After killing the mildew, thoroughly dry the area using a hair dryer.
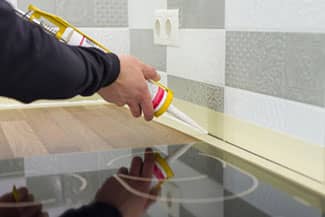
- Apply painter’s tape to each side of the joint. The caulking will go between the two pieces of tape, making straight, smooth lines.
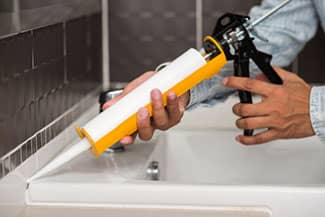
- Trim the nozzle at a 45-degree angle near the tip, making sure it’s just big enough to fill the joint.
- Point the nozzle to the joint. It is up to you which end you start and whether you pull or push the caulk, as long as the direction makes for a steady stream while pulling the trigger. Be consistent. Moving too fast may cause beading and the caulk will be too thin, with bubbles or breaks in the seal. Moving too slow, and you’ll waste it while making a mess.
- Smooth the caulk with your finger in a damp rag. Immediately remove the tape by pulling it out and away from the freshly caulked joint. Do not touch the caulk or get it wet for at least 24 hours.
- Store the remaining caulk by putting a nail or piece of wire into the tube’s nozzle to keep it from plugging up. Wrap the nozzle in several layers of masking tape. Use the tube within six months, otherwise, it will be as hard as a rock.
Now off to the caulking aisle you go! Make sure someone knows where you’re going in case you don’t make it back within a few days.
###
Homeowner Handbook To-Do | #InteriorCaulking