Your water heater heats and stores a lot of heated water. Calcium deposits and other gunk can collect in the bottom of it. You don’t want that to mix with the water you use to cook and bathe. Regular maintenance reduces the amount of minerals that collect in the tank which can cause smelly, foul-tasting water, low water pressure, and odd noises. A water heater flush is key to keep your water heater functioning at its best and lasting longer.
You could pay to have a plumber flush your water heater regularly, or you could follow the steps below to flush the heater yourself. If there are other issues, you may want to reach out to a plumber instead of tackling this task yourself.
The following are some tips to keep your water heater functioning well and possibly extending its life. To keep your water heater operating smoothly, it’s a good idea to flush it every six months, or at the very least a year.
Let’s get started.
Flushing The Water Heater:
1 | IMPORTANT – Turn off the electricity to the water heater before you begin.
You’ll find a circuit breaker that controls just the water heater in your home’s main breaker box. If your water heater is gas fired, there will be a small in-line gas valve close to the tank so just turn that valve off.
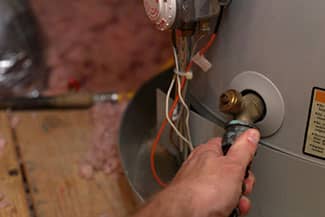
2 | Find the hose bibb
Look on the bottom of the water heater for a hose bibb with an on/off valve, like the one you attach your outdoor garden hose to.
3 | Connect a garden hose
Connect a garden hose to the water heater’s hose bibb and place the other end of the hose in your laundry sink, through a window, or out the garage door, so the water will not land on the floor inside your home. Make sure it does not drain into a landscape or grass area as the hot water may damage your plants.
4 | Turn on the valve
Turn the valve to allow water to flow from the tank through the hose you just attached.
5 | Caution! Hot water
Let the water cool as it can be 120 degrees draining through the garden hose. Water will start to drain out of the water heater, along with the gunk from the bottom. When it starts to run clear, it’s finished. It will take roughly 10 to 15 minutes.
6 | Water should flow freely
If the water doesn’t flow out freely, it could mean there is a huge sediment build-up on the bottom of the tank. In that case, call a plumber.
7 | Bring it back to working order
Turn the drain valve off, disconnect the hose, and turn the electricity to the water heater back on. For gas fired units, turn the in-line gas valve back on and following the instructions on your heater, relight the pilot light. Make sure that the water heater is completely full of water before you turn the electricity or gas back on.
Flushing your water heater not only makes the appliance run more efficiently and ensures your family is using clean water, it saves energy. In some water heaters, a quarter of the tank can fill with deposits. The higher they build up, the less efficiently the heater works, and the less hot water you have to save.
YouTube | See how it’s done
A Note About Anode Rods
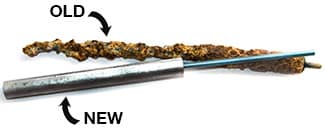
Sediment in the tank is normal. The job of the anode rod, the steel core wire encased with aluminum, magnesium, or zinc that is attached to the inside of the water heater, prevents the heater’s lining from corroding. Over time the anode rod gets smaller, as it is supposed to, because it is keeping minerals out of the water flowing through the faucets. To extend the life of your water heater replace the anode rod as soon as the magnesium layer is used up and only the steel rod is intact. If you wait until the steel rod is corroded it is probably too late as that means the inside of the tank is also likely to be corroded. Rods cost between $20 to over $100 depending the heater.
While you’re flushing the water heater, you may as well take these additional maintenance steps.
Test the TPR Valve
The temperature-pressure-release (TPR) valve is on the top or side of the tank. It opens if the tank pressure gets too high. Shut off the power and the cold-water supply valve. Place a bucket under the pipe connected to the lift the valve’s tab to let some water out, then let go. If water keeps flowing, drain the tank partway, unscrew the old valve with a pipe wrench, and install a new one. The valve costs between $5 to $20.
Insulate the Heater
Adding insulation may reduce heat loss by up to 45 percent and may shave as much as nine percent off water-heating costs. Using an insulating blanket, cut it to fit around pipes, TPR valve, and the temperature control knob. Wrap the side of the tank, and seal seam with foil tape.
IMPORTANT: Do not cover the tops of oil or gas heaters. Cap an electric heater with a large circle of insulation. Tape the edges to the side of the tank to keep it secured.
SOLAR WATER HEATER CARE
If you have a solar water heater, take the following steps to keep it in good working condition.
If you are not comfortable performing the flush or other maintenance tasks, call a professional.
1 | Keep it in the sun.

As trees in your yard grow taller, they can cast shadows over your collectors; so can the addition your neighbor puts on the house next door. A shady spot is no place for a device that’s trying to capture sunrays. Check for shading at least once a year. Check it at three points during the day: mid-morning, high noon and late afternoon.
2 | Dust it off.
Arizona is dry and dusty, so your collector might be collecting as much dust as sun. There is not a whole lot of cleaning to be done as the rain will wash away the dust. A windy day with light rain may cause the panels to get spotty, but not so much that the sun cannot penetrate. If the panels get caked on mud, spray reverse osmosis water and squeegee it off. Do not use hose water. It has too many minerals.
3 | Seal it tight.
Regularly inspect your collector for cracks, discoloration (if the “glazing” is yellowing, you might need to replace it) and worn seals.
4 | Clean out the mineral buildup.
Arizona’s hard water can be tough on a solar water heater. The minerals in the water can cause a buildup of limescale in the system’s solar collector, distribution pipes and heat exchanger that can hurt your system’s performance and even cause it to fail. You can circulate a mild solution of vinegar and water through the collector every few years. But your best bet is to invest in a mechanical water softener, which will help prevent limescale buildup on all of your home’s appliances, pipes and faucets.
Learn More About Solar Water Heaters
Extending the Life of Your Water Heater
As noted, Arizona’s water is loaded with minerals. You may want to remove those minerals by installing a water softener to treat water used for showers, bathing, and laundry. Softer water also reduces corrosion in pipes and mineral build-up in the water heater. Whatever water softening system you use; it is important to regularly replace the filters and/or membranes to extend the life of your water heater and keep it working at its highest capacity.
###
Homeowner Handbook | #WaterHeater