WEEEEE! CABINET SLIDE OUTS
If you find that you can’t find the tops to containers, the smallest saucepan, a tiny bottle of spices, or the last roll of toilet paper, it may be time to add slide out shelves to your kitchen and bathroom cabinetry. You can make them yourself, buy prefab sets, or hire a contractor to make and install them.
Slide Out Benefits
No matter how you go about it, slide out shelves, also known as pull out or roll out shelves are helpful in any home environment. Why? Organization. Organization. Organization. Installing the slide outs will reduce your actual storage shelf space, but for the organization and ease of access most homeowners accept that as a reasonable sacrifice.
- Slide outs provide easy access to the items you use most or even rarely use.
- No longer will you have to get on your hands and knees or contort your body into the cabinet to find what you are searching for.
- Meal prep and clean up moves faster because everything is in easy reach.
- Because you can see everything in the cabinet, you know what is on hand, thus not buying multiple items you don’t need.
- They maximize storage space and allow you to get many items off the counter, including rarely used appliances and gadgets.
Building the Shelves, Yourself
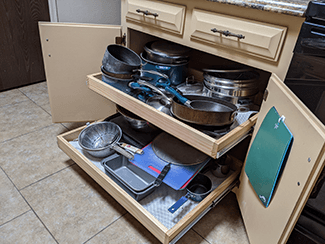
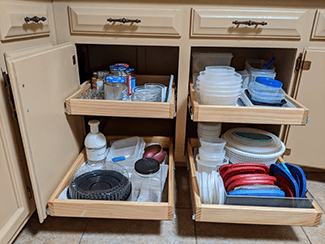
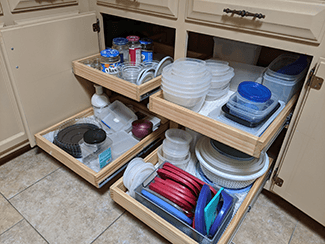
Even if you are handy and know your way around a woodshop, making the slide outs will take some skill. James Kregar, a Rosie on the House listener and husband of a staff member, recently made his slide outs over a couple of weekends (see pictures). “FINALLY!” according to his wife. James is well acquainted with carpentry and offers a few tips if you opt to make your own.
“First you have to consider the space, what you will store in the cabinets, and how high the sides should be to prevent items from tipping over. Then design the shelves based on that information,” he suggests.
Build sloping sides for storing pots and pans and different-size items on one shelf.
Low sides that are no higher than three inches are good for canned goods and spices and allows the labels to be seen.
High sides at six inches tall are ideal for items that tend to fall over, such as stackable containers or bags of beans and rice.
Choosing the Wood
James prefers Baltic birch plywood because “it is always straight and true,” is pre-sanded and has a finished coat so the lacquering step is eliminated. Though it is more expensive. A 5×5-ft. sheet will run roughly $65 compared to a 4×8-ft sheet at $50 for other standard hardwood plywood. If cost is an issue, he suggests using hardwood such as maple, pine, or poplar. For his project, James chose poplar wood because it does not have grain lines, is easy to cut and shape, and kept his costs down.
Selecting the Right Hardware
There are dozens of drawer slides available. James suggests these two types:
Full extension slides fully extend out giving you access to everything on the shelf. They can withstand 75 to 100 pounds of storage, and cost about $20, but you can get 200-lb. versions for about $40 a set. Home centers carry ball-bearing slides, but you’ll find a wider variety online. They can be difficult to install. If the drawer is a hair too big or small, these slides will not glide.
Roller slides glide on plastic wheels. They are easy to find, inexpensive, and install easily. Most are rated to hold 35 to 100 lbs. For heavy-duty rollouts use slides rated for at least 100 lbs. Because this type only extends three-quarters, the back of the drawer stays in the cabinet, so there may be some reach involved to get to an item.
Tips:
- Measure twice. Cut once.
- Cut the drawer boxes 1/32 inch smaller than needed. You can shim behind a slide with layers of masking tape to tighten a drawer that is too small. It’s difficult to compensate for a drawer that’s too wide.
- Look for protruding hinges and doors that don’t open fully or protrude into the cabinet when measuring for the spacer width.
- If the cabinet is more than 30 inches wide, two narrow slide outs side by side will work better than a single wide one. Smaller slide outs glide more smoothly and easily.
Buying Prefab Slide-Outs
If building from scratch is beyond your skillset or lack of available tools, buying prefab shelves is a handy option. Most big box home stores and online retailers sell them. For example, just one 6×36 made-to-fit slide out shelf, full-extension with drawer guides will run $90.
Hire a Contactor
The benefit of hiring a contractor is you can get custom-made slide outs to fit your style and needs. Many companies advertise slide out shelves, particularly in the weekly mailers. Be sure the contractor you choose is licensed by the Arizona Registrar of Contractors as well as bonded and insured. Expect to pay more if you go this route.
A related project that can be completed simultaneously would be add soft close hinges on your cabinet doors. This is a really nice and easy upgrade on the cabinets! Just switching existing hinges with a style that matches with the soft close feature (which is just a few screws backed on and a few screws reset) add an upgraded element to the shelves. It is such an easy install that you could also add soft closed drawer slides to all your existing cabinet drawers!
Regardless of how you get the slide out shelves in, you will be amazed at how much more organized your kitchen and bathrooms will be. The area will be free of clutter and feel more spacious. Plus, you don’t need the flexibility of a Cirque du Soleil acrobat to reach inside the cabinets.